Spot DCA Safety Orders allow traders to add to an existing spot position when price moves below the original Base Order entry. They can reduce the average entry price of a position, but they also increase capital exposure while the market is declining. Configuring them requires more than choosing a few percentage levels: traders need to understand the trigger reference, order sizing, execution conditions, and exit restrictions.
This guide explains how Safety Orders work in Prime Trading Bot and how to evaluate their configuration before trading live on Binance Spot.
What Are Spot DCA Safety Orders?
A Safety Order (SO) is an additional buy placed after the initial Base Order (BO) has filled.
In a typical DCA cycle:
- The bot waits for the configured entry conditions.
- The Base Order opens the position.
- Price moves lower and reaches a configured Safety Order level.
- The bot buys additional units of the asset.
- The position continues until a take-profit or stop-loss condition closes it.
The purpose of Safety Orders is to distribute purchases across multiple price levels rather than committing all planned capital to the initial entry.
However, additional purchases do not guarantee that the position will recover. If price continues declining beyond the final Safety Order, the trader remains exposed to the falling asset.
How Safety Order Trigger Levels Work
One of the most important configuration details is the reference price used to calculate Safety Order triggers.
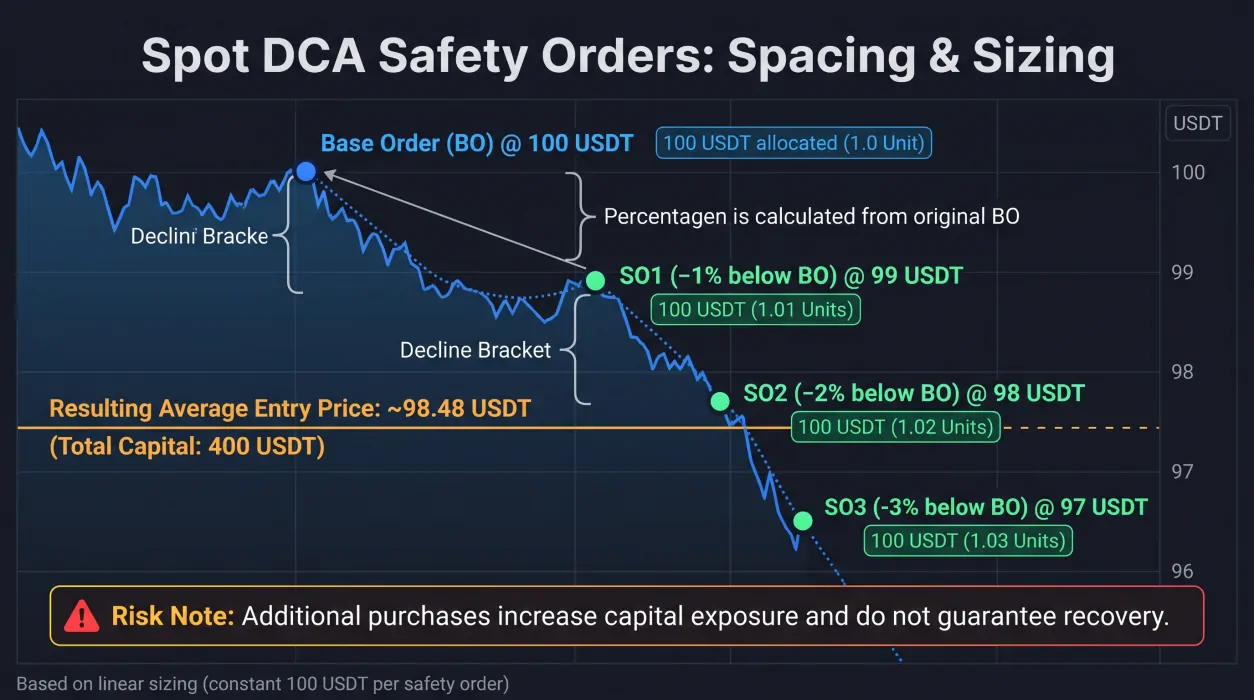
In Prime Trading Bot, Safety Order percentages are calculated below the original Base Order fill price. They are not calculated below the moving average cost of the position.
For example, suppose a Base Order fills at 100 USDT.
| Safety Order | Configured trigger | Trigger price |
|---|---|---|
| SO1 | 1% below BO | 99 USDT |
| SO2 | 2% below BO | 98 USDT |
| SO3 | 3% below BO | 97 USDT |
| SO4 | 5% below BO | 95 USDT |
These levels are calculated from the original Base Order price.
This distinction matters because the position's average entry price changes after each additional purchase, while the configured trigger reference remains the original Base Order price.
Why trigger spacing matters
Closer Safety Order levels concentrate purchases near the initial entry. Wider levels reserve additional capital for larger declines.
Neither approach is universally better.
| Configuration | Potential advantage | Main trade-off |
|---|---|---|
| Closely spaced levels | More opportunities for additional purchases during smaller declines | Capital may be used quickly |
| Widely spaced levels | Additional capital remains available for deeper declines | Price may recover without reaching later levels |
| Uneven levels | Allows different spacing across the decline | Requires more deliberate configuration |
A useful starting point is to define the price decline the strategy is intended to cover, then distribute the available Safety Orders across that range.
Understanding Safety Order Volume
Safety Order volume determines how much capital the bot allocates to each additional purchase.
Prime Trading Bot uses linear Safety Order sizing. The configured volume scale is applied equally to every Safety Order tier rather than automatically increasing each successive order.
This differs from a martingale-style approach, where order sizes increase after each decline.
Linear sizing example
Assume the following hypothetical configuration:
- Base Order capital: 100 USDT
- Safety Order volume scale: 1.0
- Maximum Safety Orders: 3
- Each Safety Order allocation: 100 USDT
The planned allocation is:
| Order | Capital allocation |
|---|---|
| Base Order | 100 USDT |
| SO1 | 100 USDT |
| SO2 | 100 USDT |
| SO3 | 100 USDT |
| Total planned capital | 400 USDT |
This example illustrates the allocation structure, not a recommended trading configuration.
The total planned capital should be calculated before the bot starts. A strategy that requires more USDT than the available balance cannot execute all configured orders.
How order size affects average entry price
When additional purchases execute at lower prices, they change the average cost of the position.
The average entry price can be calculated as:
\[ \text{Average Entry Price} = \frac{\text{Total Purchase Cost}} {\text{Total Units Purchased}} \]
Consider a simplified example:
| Order | Price | Capital | Units purchased |
|---|---|---|---|
| BO | 100 USDT | 100 USDT | 1.0000 |
| SO1 | 99 USDT | 100 USDT | 1.0101 |
| SO2 | 98 USDT | 100 USDT | 1.0204 |
| Total | 300 USDT | 3.0305 |
The resulting average entry price is approximately 99 USDT per unit.
This calculation excludes trading fees and assumes the entire allocation fills at the stated price.
The lower average entry price does not eliminate the unrealized loss if the market continues falling.
Safety Order Execution Rules
A configured trigger does not necessarily mean an order will execute immediately.
Prime Trading Bot applies several conditions before placing a Safety Order:
- No take-profit tier has fired yet.
- At least 60 seconds have passed since the previous buy.
- Sufficient USDT is available.
- If RSI is enabled, RSI must be above the configured
rsi_minvalue.
These conditions are important when evaluating the behavior of a strategy during rapid price movements.
The RSI falling-knife filter
When RSI is enabled, the bot checks whether RSI is above the configured minimum before placing a Safety Order.
This prevents the bot from adding to a position when RSI is deeply oversold according to that threshold.
However, RSI is not a guarantee that a decline has ended. It can remain oversold during a strong downtrend, and a filter may delay or prevent purchases that would otherwise have occurred.
Traders should test the filter as part of the complete strategy rather than evaluating Safety Order levels in isolation.
What Happens After Take Profit?
Safety Order behavior changes once a take-profit tier fires.
In Prime Trading Bot, once any take-profit tier fires, Safety Orders are permanently locked for that position.
This includes a partial exit through TP1.
For example, a configuration may use:
- TP1 at 2%, selling 40% of the position.
- TP2 at 4%, selling 50%.
- TP3 at 6%, selling 100%.
If TP1 fires, the remaining position cannot receive additional Safety Orders.
This is an important consideration for traders who expect a position to continue accumulating after a partial profit-taking event.
The strategy should be evaluated as a complete cycle, including both its accumulation phase and its exit phase.
For additional details, review the Spot DCA strategy documentation.
A Practical Safety Order Configuration Process
Before deploying a configuration, use a structured process to evaluate the relationship between price levels, order sizes, and available capital.
Step 1: Define the initial entry
Determine how the Base Order will be triggered.
The bot supports configurable indicators, including RSI, moving average crossover, MACD, ADX, Bollinger Bands, and volume.
All enabled indicators must be true simultaneously.
If no indicator is enabled, the Base Order executes immediately.
Step 2: Define the maximum planned decline
Choose the lowest price level at which the strategy is intended to place a Safety Order.
This should be based on the strategy's assumptions and capital limits, not on an expectation that price will necessarily recover.
Step 3: Calculate the total allocation
Estimate the capital required for the Base Order and every planned Safety Order.
The calculation should include the possibility that all configured purchases execute.
Step 4: Select the order volume scale
Choose an order size that fits the total capital allocation.
Because the bot uses linear sizing, each Safety Order tier receives the same configured volume multiplier.
Step 5: Evaluate exit behavior
Review static take profit, dynamic take profit, trailing take profit, and stop-loss settings.
Understand how partial exits affect the remaining position and Safety Order availability.
Step 6: Test the configuration
Use historical backtesting to compare how different configurations behave under the same market conditions.
The Spot DCA Bot backtest deducts 0.1% per order and reports net profit, cycles, win rate, and filled orders.
It is a simplified simulation that ignores missed-order latency. Historical results should therefore be treated as a comparison tool rather than a forecast of live performance.
The DCA backtesting guide explains the testing process.
Common Safety Order Configuration Mistakes
Using too many Safety Orders
More Safety Orders require more capital.
A configuration with many levels may continue accumulating exposure during a prolonged decline. The number of orders should be consistent with the available capital and the intended strategy.
Ignoring the trigger reference
Calculating Safety Order levels from the moving average cost instead of the original Base Order price produces a different configuration from the one implemented by the bot.
Always calculate the configured percentages from the original Base Order fill.
Increasing order sizes without calculating total exposure
Larger orders can reduce the average entry price more quickly, but they also increase the amount of capital exposed to the market.
Do not evaluate order size solely by its effect on average entry price.
Assuming every trigger will fill
Safety Orders do not rest on the exchange order book. A rapid price movement through a trigger level that recovers in under a second can be missed.
The bot also applies execution conditions and order handling rules. Backtests do not fully reproduce these live execution limitations.
Treating take profit as a complete risk-control system
Take-profit settings define exit conditions. They do not guarantee that the market will reach those levels.
A position can remain open during an extended decline, and stop-loss market orders may execute at a different price from the configured trigger.
Key takeaways
- Spot DCA Safety Orders add to an existing position at configured levels below the original Base Order price.
- Trigger percentages are calculated from the original Base Order fill, not the moving average cost.
- Prime Trading Bot uses linear Safety Order sizing rather than automatically increasing every order.
- Safety Orders require sufficient capital and are subject to execution conditions, including an RSI filter when enabled.
- Once any take-profit tier fires, Safety Orders are permanently locked for that position.
- Backtesting can help compare configurations, but it cannot guarantee future results or reproduce every live execution condition.