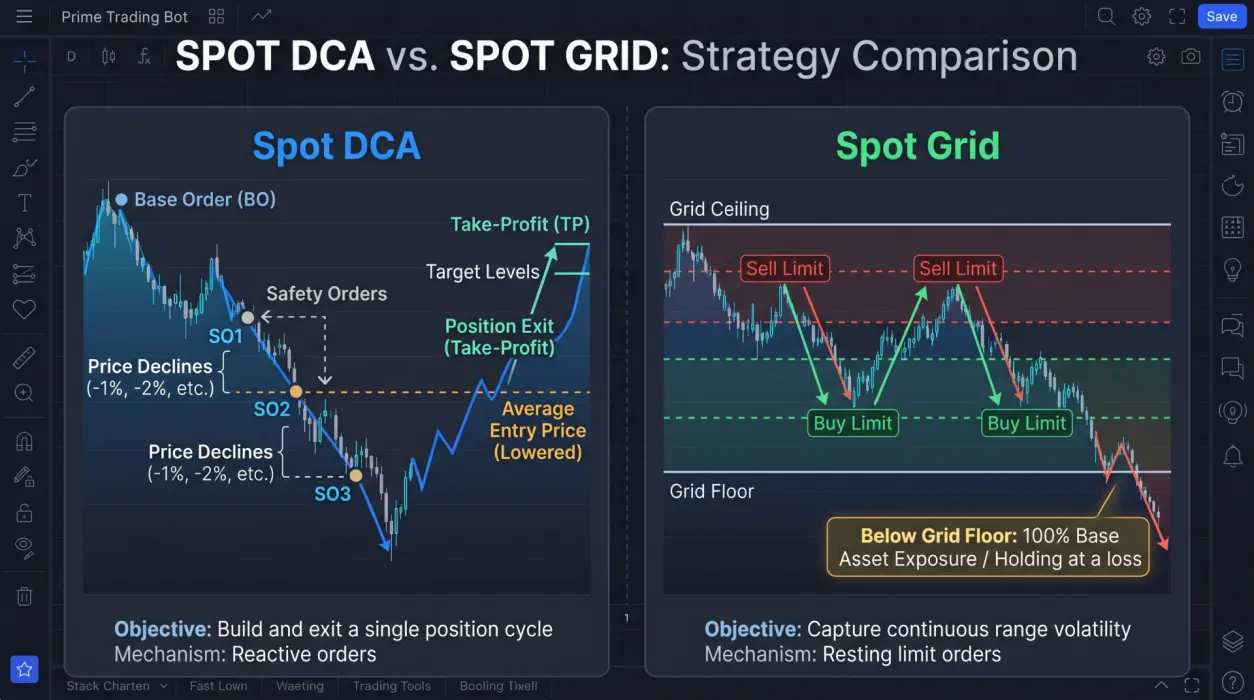
Spot DCA and spot grid are two different approaches to automating Binance spot trading. DCA builds a position through an initial buy and additional purchases during price declines, while grid trading places buy and sell orders across a defined price range. The better choice depends on market structure, capital allocation, exit rules, and how you want to manage exposure when price moves against your position.
Neither strategy removes market risk. Understanding how each handles entries, exits, and adverse price movements is more important than choosing a bot based on its name.
Spot DCA vs. Spot Grid: The Core Differences
Both strategies automate spot orders, but they respond to price movements differently.
| Characteristic | Spot DCA | Spot Grid |
|---|---|---|
| Primary objective | Build a position and manage its exit | Trade price movement within a range |
| Entry mechanism | Base Order triggered by configured indicators | Initial allocation and grid buy orders |
| Additional buys | Safety Orders during declines | Buy orders at lower grid levels |
| Selling mechanism | Take Profit conditions | Sell orders above filled buy orders |
| Market conditions | Dips, trends, or volatile markets, depending on configuration | Sideways or range-bound markets |
| Order placement | Reactive LIMIT orders priced near the observed market | Resting LIMIT orders on the exchange book |
| Main exposure | Accumulating a position during a declining market | Holding the base asset when price falls outside the range |
| Exit management | Static, dynamic, or trailing take profit; optional stop loss | Grid equity take profit and stop loss options |
The important distinction is that DCA manages a trading cycle around a position, while grid trading repeatedly exchanges assets across price levels.
How Spot DCA Works
A spot DCA strategy begins with a Base Order (BO). When the configured entry conditions are satisfied, the bot buys the selected asset.
If price declines, the bot can place Safety Orders (SOs) at predefined levels below the original Base Order price. These additional purchases increase the position size and change its average entry price.
The cycle ends when a configured exit condition is triggered or the position is otherwise closed.
Entry conditions and technical filters
The Spot DCA Bot supports configurable indicators for entry decisions.
Examples include:
- RSI: Identifies momentum conditions. RSI can remain oversold during a strong downtrend.
- Moving average crossover: Provides trend information but can generate delayed signals or whipsaws.
- MACD: Evaluates momentum and trend changes, with similar lag limitations.
- ADX: Helps filter weak trends but is also a lagging indicator.
- Bollinger Bands: Identifies price relative to a volatility band. Price can continue moving along the lower band during a decline.
- Volume: Confirms activity but does not independently indicate direction.
All enabled indicators must be true simultaneously. This AND-based entry logic can reduce the number of entries, but strict conditions may also prevent a trade from starting.
If no indicator is enabled, the bot buys the Base Order immediately.
Safety Orders and position management
Safety Orders are triggered at percentages below the original Base Order price, not below the moving average cost.
For example, configured levels of 1% and 2% refer to declines from the original Base Order fill price.
The bot uses linear Safety Order sizing rather than automatically increasing the size of every subsequent order. This distinction matters when estimating the capital required for a complete trading cycle.
Safety Orders also have operational restrictions:
- At least 60 seconds must pass since the previous buy.
- Sufficient USDT must be available.
- If RSI is enabled, the configured minimum RSI condition must be satisfied.
- Once any take-profit tier fires, Safety Orders are permanently locked for that position.
The final restriction is particularly important. A partial exit changes the remaining position's management. A trader should not assume that additional buys will continue after the first take-profit event.
Take-profit and stop-loss options
The DCA Bot supports several exit mechanisms:
| Exit type | How it works | Main consideration |
|---|---|---|
| Static TP | Sells at configured profit percentages | Fixed targets may not adapt to volatility |
| Dynamic TP | Uses entry price and ATR | Depends on volatility and configuration |
| Trailing TP | Follows the price peak and exits after a pullback | A market sell may experience slippage |
| Static SL | Closes the position at a configured loss percentage | Can realize losses during temporary declines |
| Dynamic ATR-based SL | Uses ATR to determine the stop level | Stop distance changes with volatility |
These options are not interchangeable. For example, enabling static and dynamic take profit together introduces a specific interaction: dynamic TP remains locked until TP3 fires when static TP is enabled.
Traders should understand these rules before running a strategy.
How Spot Grid Works
A spot grid places buy and sell LIMIT orders at fixed price intervals within a selected range.
When a buy order fills, the bot places a sell order one grid step higher. When a sell order fills, it places a buy order one step lower.
The process repeats as price moves between grid levels.
Unlike DCA, the grid does not wait for a single entry signal before beginning its trading cycle. It establishes a structure of orders across the configured range.
Choosing a grid range
The range defines the prices where the bot will operate.
The Spot Grid Bot supports:
- Manual range: The trader specifies the ceiling and floor.
- Recent High/Low: The range is calculated from recent price extremes.
- Bollinger Bands: The range is based on volatility bands.
- ATR: The range is calculated using average true range.
Automatic ranges are calculated at the start. They should not be treated as continuously updated forecasts of future price boundaries.
Arithmetic vs. geometric grids
Arithmetic grids use equal absolute price differences between levels.
Geometric grids use equal percentage differences between levels.
| Grid mode | Structure | Typical application |
|---|---|---|
| Arithmetic | Equal price differences | Tighter, relatively stable ranges |
| Geometric | Equal percentage differences | Wider or more volatile ranges |
The product documentation recommends geometric grids when the ceiling and floor differ by more than 30%.
Grid density also affects execution. The documented sensible range is 20–80 grids. Higher counts can increase API usage, and each order must satisfy Binance's minimum order requirements.
What happens outside the grid?
A grid strategy needs a plan for price movements beyond its boundaries.
Below the floor, the default behavior is to hold the accumulated coins until price recovers. In a sustained decline, this can leave the strategy holding an asset at a loss.
Above the ceiling, the grid stops trading the upside.
The bot offers additional mechanisms:
- Sliding Grid: Moves the grid upward after a breakout.
- Trailing Down: Moves the grid downward to follow falling prices.
- DCA Safety Net: Adds purchases below the floor and attempts to sell the accumulated position on a bounce.
The DCA Safety Net introduces additional exposure and uses martingale-style sizing. It should be evaluated separately from the standard grid configuration.
Which Strategy Fits Different Market Conditions?
Market conditions are not known in advance. A strategy that fits a range today may become poorly suited if the market begins trending.
The following matrix provides a starting point for comparing the two approaches.
| Market scenario | Spot DCA considerations | Spot Grid considerations |
|---|---|---|
| Sideways market | Entry filters and take-profit rules determine activity | Repeated movement between levels can suit the grid structure |
| Gradual decline | Safety Orders may build a position, increasing capital exposure | Grid may accumulate the falling asset |
| Strong downtrend | Entry filters may delay buys, but signals can still fail | Grid can become fully allocated to the declining asset |
| Strong uptrend | Entry and exit conditions determine participation | Price may move above the ceiling and leave the grid inactive |
| Volatile market | ATR-based exits and entry filters may help structure decisions | Grid spacing and range selection become important |
When DCA may be more appropriate
Consider DCA when your strategy is based on entering a position under specific conditions and managing that position through staged purchases and exits.
It may be suitable when:
- You want indicator-based entry conditions.
- You have a defined capital allocation for Base Orders and Safety Orders.
- You want configurable take-profit and stop-loss rules.
- You are comfortable managing a position through a declining market.
The main risk is accumulating an increasingly large position while price continues falling. Safety Orders do not guarantee that price will recover to a profitable exit level.
When grid trading may be more appropriate
Consider grid trading when your strategy is based on repeated price movement within a defined range.
It may be suitable when:
- You expect continued movement within a selected range.
- You want resting buy and sell orders at predefined levels.
- You can estimate the capital required for both sides of the grid.
- You have a plan for breakouts and sustained declines.
A grid is long-biased. It does not automatically hedge the base asset or protect against a prolonged decline.
Comparing Capital Requirements and Execution
Capital planning should include more than the initial order.
For DCA, estimate the capital needed for the Base Order, every planned Safety Order, and any additional reserve required by your strategy.
For grid trading, account for the initial base-asset allocation, quote-asset allocation, number of grid levels, and minimum order sizes.
Both strategies also incur trading fees. The Spot DCA Bot's reactive LIMIT orders are usually taker orders because they are priced near the observed market. Grid orders rest on the exchange book, so maker fees may be possible.
Neither order type guarantees a particular execution price or fee classification in every market condition.
Testing Before Live Trading
Backtesting and simulated trading can help evaluate whether a configuration behaves as expected.
The Spot DCA Bot backtest:
- Downloads candle data from Binance.
- Uses the configured strategy settings.
- Deducts 0.1% per order.
- Reports net profit, cycles, win rate, and filled orders.
- Simplifies execution by ignoring missed-order latency.
The Spot Grid Bot also supports backtesting and Paper Trading using live Binance prices for simulated fills.
These tools have different purposes. Backtesting helps compare historical behavior, while Paper Trading helps observe simulated execution. Neither establishes how a strategy will perform in future markets.
A practical evaluation process is:
- Define the market conditions the strategy is intended to handle.
- Configure entry, range, and exit rules.
- Test historical periods that include unfavorable conditions.
- Review capital usage, drawdowns, and incomplete trading cycles.
- Run simulated trading before considering live execution.
- Reassess the configuration when market conditions change.
Using Prime Trading Bot for Each Strategy
Prime Trading Bot provides separate self-hosted software for Binance Spot DCA and Spot Grid trading.
The Spot DCA Bot supports indicator-based entries, Safety Orders, and configurable take-profit and stop-loss mechanisms.
The Spot Grid Bot supports fixed price ranges, arithmetic and geometric grids, and additional range-management options.
Both products run on the trader's own Windows or Linux server, use Binance Spot API access, and do not require withdrawal permission on API keys.
Before installation, review the user guide, the DCA strategy documentation, and the Grid strategy documentation.
The software automates configured rules. It does not select a suitable strategy or eliminate the need to monitor market exposure.
Key takeaways
- Spot DCA builds and manages a position through an initial buy, additional purchases, and configured exits.
- Spot Grid trades repeated price movements within a defined range using buy and sell LIMIT orders.
- DCA can accumulate exposure during a decline, while grid trading can become fully allocated to a falling asset.
- Capital requirements, order mechanics, fees, and exit behavior should be evaluated before choosing either strategy.
- Backtests and simulated trading are useful evaluation tools, not forecasts of future performance.